How to log into course-specific account on ieng6
Step 1: Download VSCode
Click on this Link to go to the Visual Studios code website. Depending on the system you are downloading on (Mac or Windows), follow the instructions on the website to download for your specific system.

After installing VSCode, and opening up the application, your VSCode window should look like the picture above.
Step 2: Remotely Connecting
If on a windows system, first you need to install a program called OpenSSH which is a program that will connect your computer to other computers that have this account.
Follow these steps to Install OpenSSH
Next you will need to look up your course-specific account for CSE15L here: https://sdacs.ucsd.edu/~icc/index.php
Your account name should be found under “Additional Accounts”.
Now using Visual Studio Code, we will connect to the remote computer using VSCode’s remote option.
The first step is to open a terminal in VSCode (Ctrl +, or click on the Terminal tab at the top, then clock on New Terminal). The next step is to type this command in your terminal, but replace the “zz” by the letters in your course-specific account.
$ ssh cs15lsp22zz@ieng6.ucsd.edu
If this is your first time connecting to this server, you will probably get a message like this:
⤇ ssh cs15lsp22zz@ieng6.ucsd.edu
The authenticity of host 'ieng6.ucsd.edu (128.54.70.227)' can't be established.
RSA key fingerprint is
SHA256:ksruYwhnYH+sySHnHAtLUHngrPEyZTDl/1x99wUQcec.
Are you sure you want to continue connecting
(yes/no/[fingerprint])?
Type yes and press enter, it will ask for your password and your password is the password you use to log in to your school account.
After logging in, the whole interaction should look like this:
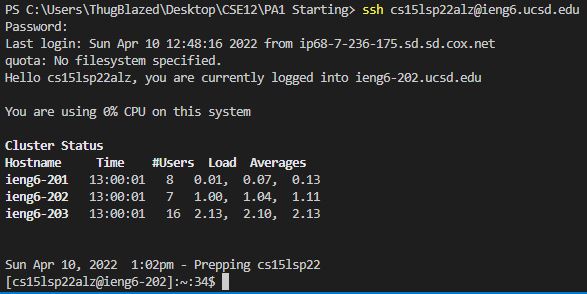
Now your terminal is connected to a computer in the CSE basement, and any commands you run will run on that computer. Your computer is called the client and the computer in the basement is called the server.
Step 3: Trying Some Commands
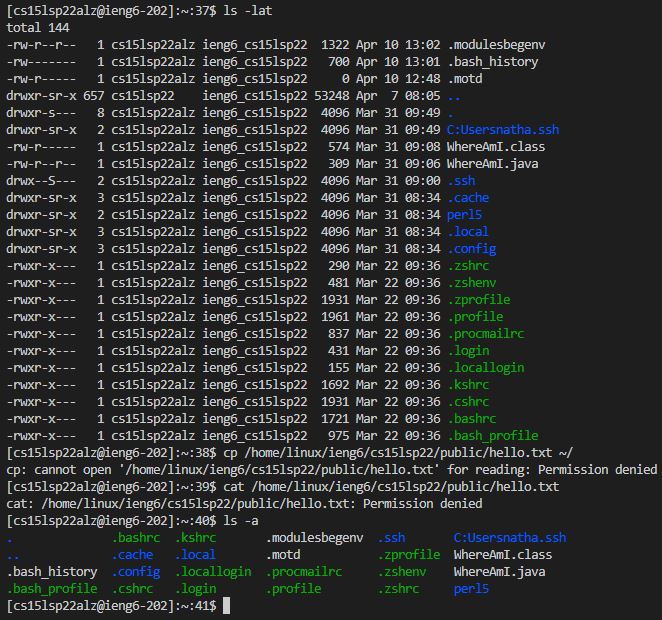
Try running the commands cd, ls, pwd, mkdir, and cp a few times in different ways both on your computer, and on the remote computer after doing the ssh command.
Here are some useful commands to try:
cd ~cdls -latls -als <directory> where <directory> is /home/linux/ieng6/cs15lsp22/cs15lsp22abc, where the abc is one of the other group members’ usernamecp /home/linux/ieng6/cs15lsp22/public/hello.txt ~/cat /home/linux/ieng6/cs15lsp22/public/hello.txt
Here is an example of what these commands look like:
If you want to log out of the remote server in your terminal, you can use:
- Ctrl + D
- Run the command
exit
Step 4: Moving Files with scp
Now that we have learned to do some work on local and remote computers, one key step in working remotely is being able to copy files back and forth between the computers. In order to do so we will be using the command called scp, and we will always run it from the client (YOUR computer). Create a file on your computer called WhereAmI.java and put the following code into it:
class WhereAmI {
  public static void main(String[] args) {
    System.out.println(System.getProperty("os.name"));
    System.out.println(System.getProperty("user.name"));
    System.out.println(System.getProperty("user.home"));
    System.out.println(System.getProperty("user.dir"));
  }
}
Run it using javac and java on your computer. You should be seeing different contents from your own computer.
Next, in the terminal from the directory where you made this file, run this command (replacing zz with your username):
scp WhereAmI.java cs15lsp22zz@ieng6.ucsd.edu:~/
You should be prompted for a password.
Now, log back into ieng6 with ssh again, and type the command ls. Now you will see the file that you created in your own computer in the home directory of the ieng6 computer. You will be able to now run that file on the ieng6 computer using javac and java.
Here is an example of what that process should look like:

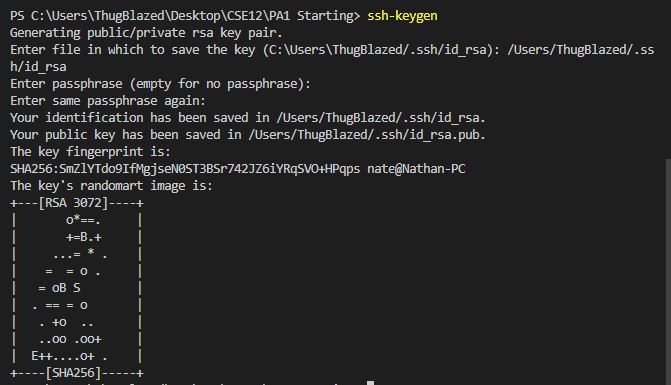
Step 5: Setting an SSH Key
We need a more efficient way to loggin in to the server, and that is using ssh keys.
Here is what to run when setting this up:
# on client (your computer)
$ ssh-keygen
Generating public/private rsa key pair.
Enter file in which to save the key (/Users/<user-name>/.ssh/id_rsa): /Users/<user-name>/.ssh/id_rsa
Enter passphrase (empty for no passphrase):
Make sure you do not add a paraphrase for this step (just press enter).
Enter same passphrase again:
Your identification has been saved in /Users/<user-name>/.ssh/id_rsa.
Your public key has been saved in /Users/<user-name>/.ssh/id_rsa.pub.
The key fingerprint is:
SHA256:jZaZH6fI8E2I1D35hnvGeBePQ4ELOf2Ge+G0XknoXp0 <user-name>@<system>.local
The key's randomart image is:
+---[RSA 3072]----+
| |
| . . + . |
| . . B o . |
| . . B * +.. |
| o S = *.B. |
| = = O.*.*+|
| + * *.BE+|
| +.+.o |
| .. |
+----[SHA256]-----+
This is what running these steps in the terminal looks like:
If on Windows system, follow the extra ssh-add steps here:
This creates two new files on your system; the private key (in a file id_rsa) and the public key (in a file id_rsa.pub), stored in the .ssh directory on your computer.
The next step is to copy the public key to the .ssh directory of your user account on the server.
$ ssh cs15lsp22zz@ieng6.ucsd.edu
<Enter Password>
# now on server
$ mkdir .ssh
$ <logout>
# back on client
$ scp /Users/<user-name>/.ssh/id_rsa.pub cs15lsp22zz@ieng6.ucsd.edu:~/.ssh/authorized_keys
# You use your username and the path you saw in the command above
After finishing these steps, when logging in using ssh or running scp, you won’t need to enter your password again.
This is what your terminal would look like, as it automatically logs you in without a password:

Step 6: Optimizing Remote Running
After making an edit to a file in the client, and you want to copy that edited file to the server in a more efficient way here are the steps:
- After making an edit, type in
scp <FileName> cs15lsp22zz@ieng6.ucsd.edu:~/in the terminal. - Next, type in
ssh cs15lsp22zz@ieng6.ucsd.edu "javac <FileName>"to compile the file in the server. - Lastly, type in
ssh cs15lsp22zz@ieng6.ucsd.edu "java <FileName>"to run it in the server.